When patching drywall, avoiding flashing and shiners is key to getting a smooth, seamless finish.
It all starts with proper surface prep—cleaning and sanding rough edges goes a long way. Picking the right joint compound and applying it in thin, even layers also makes a big difference. But there’s a bit more to consider if you want a result that looks truly professional.
Let’s go through the basics to help you get that flawless repair.
Key Takeaways
-
Clean the surface properly before patching to remove dust and grease—this helps with better sticking and a neater finish.
-
Use the right joint compound. Apply it in thin layers and give each coat enough time to dry—this helps avoid shadows or flashing.
-
Feather the edges of the compound to blend the patch with the wall and avoid visible lines.
-
Sand the patched area gently, starting with coarse grit and moving to finer grit, for a super smooth finish.
-
Use a good-quality primer after the compound dries to seal the area. This helps the paint absorb evenly and prevents flashing.
Understanding Flashing and Shiners
When patching drywall, two common problems can ruin your hard work: flashing and shiners.
Flashing happens when paint soaks into patched areas differently, leaving shiny or dull spots. This is usually caused by uneven sanding, poorly feathered edges, or skipping primer. To fix it, make sure you sand smoothly and always prime before painting.
Shiners are caused by screws or nails that haven’t gone deep enough into the studs. They leave visible bumps or dimples. The fix? Re-secure the fasteners properly and use enough joint compound to smooth things out.
With the right techniques, you can keep both issues at bay and enjoy a flawless finish.
Preparing the Surface for Patching
Getting the surface ready is one of the most important parts of a good patch.
Start by cleaning the area. Wipe it down with a damp cloth or sponge to remove dust, dirt, and grease. Let it dry fully before you do anything else. This step helps the joint compound stick properly and keeps problems like mould or bubbling at bay.
Next, check for cracks or dents that need filling. Prepping the surface well makes the patch stronger and helps stop flashing and shiners from showing up later.
Choosing the Right Joint Compound
Picking the right type of joint compound makes a huge difference in how your patch turns out.
Types of Joint Compounds
There are a few kinds to choose from:
-
All-purpose compounds work well for most repairs.
-
Lightweight compounds are easier to sand and handle.
-
Topping compounds give a nice, smooth final layer.
Also think about drying time. Ready-mixed compounds take longer to dry, which gives you more time to work. Quick-setting types dry faster, which is handy if you’re short on time.
Setting vs. Taping Compounds
Setting compounds come as powder and harden quickly through a chemical reaction. They’re great for big repairs and strong finishes.
Taping compounds are premixed and perfect for sealing seams and corners. They’re easier to work with but take longer to dry.
Choose the one that suits your project best.
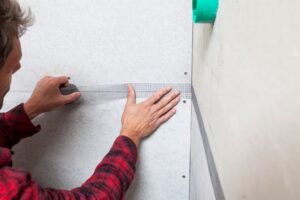
Application Techniques Matter
Even the best compound won’t help if you don’t apply it right.
Clean and sand the surface first for the best stick. Use a wider knife (10-inch) for large areas and a smaller one (4-inch) for detail work. Always apply thin coats and let each one dry before adding the next.
Doing it right will help you avoid flashing and shiners later.
Applying the Patch Correctly
To patch like a pro, you need the right approach.
Start by picking the right method for the size of the hole. For smaller spots, a lightweight compound works best. Mix it until it’s smooth.
Spread the compound in a thin layer over the patch using a drywall knife. Work from the middle out to keep things even and avoid bumps. Let each layer dry fully before adding the next, and sand gently in between.
Doing this will help your patch blend into the wall and stop any shiny spots from showing up.
Feathering the Edges
Feathering the edges helps your patch blend perfectly with the wall so no one notices the repair.
Why Feathering Matters
Feathering means gently thinning the edges of your joint compound so it blends into the wall. This stops harsh lines and helps keep the texture even. It also reduces how much sanding you’ll need.
Done properly, feathering stops flashing and helps your wall look brand new.
Tools You’ll Need
You’ll need a flexible joint knife, usually 10–12 inches wide for larger patches. Also, keep a sanding block or sponge handy to smooth things out after drying.
The right tools make all the difference in getting a clean finish.
How to Feather – Step by Step
-
Make sure the joint compound is dry.
-
Use your knife to spread a thin coat beyond the patch edge.
-
Press lightly as you move outwards to thin the compound.
-
Let it dry completely.
-
Sand gently with fine-grit paper.
Always use clean tools and apply multiple thin layers for best results.
Sanding Techniques for a Smooth Finish
Sanding is key to getting that perfect, polished look.
Start with coarse-grit sandpaper (like 80-grit) to level things out. Then switch to finer grit (like 120-grit) to smooth it down.
Use a pole sander for large flat areas and a sanding sponge or block for tight corners. Sand in light, circular motions and don’t press too hard. After sanding, wipe the dust away with a damp cloth so the area is ready for priming and painting.
Priming the Patched Area
Skipping primer is one of the easiest ways to end up with flashing—so don’t!
Why You Need Primer
Primer seals the patched area and helps the paint stick evenly. It also stops uneven shine and helps the final colour look consistent.
Picking the Right Primer
Choose a primer that suits your wall and paint type:
-
Water-based primers are great for most drywall jobs.
-
Oil-based ones seal stains well.
-
Shellac primers offer strong coverage but can be harder to work with.
Make sure you apply it evenly so the area blends in once painted.
How to Apply Primer
Use a good brush or roller and smooth, even strokes. Let it dry fully before painting. If needed, apply a second coat to even out the surface.
This step sets the stage for a smooth, even finish with no flashing.
Selecting the Right Paint
Once the patch is ready, the right paint will help everything blend beautifully.
-
Match paint sheen to the existing wall. Flat paints hide flaws best, while shiny finishes can show them off.
-
Match colour carefully—bring a sample to a paint shop if needed.
Always paint over primed patches to keep the colour even and avoid unwanted shine.
Lighting Considerations for Inspection
When checking your work, lighting makes a huge difference.
Use natural light when possible, or strong LED work lights. Look at the wall from different angles to catch any bumps, lines, or shine that don’t belong.
Shadows can reveal flaws you might not see straight on—so move around and check from every angle.
Common Mistakes to Avoid
Even experienced DIYers slip up. Here’s what to avoid:
-
Skipping surface prep (like cleaning or sanding)
-
Applying too much or too little compound
-
Rushing between layers—let each one dry
-
Forgetting to feather the edges
-
Skipping primer
Taking your time and doing each step right will help you avoid flashing and get a professional finish.
Frequently Asked Questions
Can I use spray texture over patched areas?
Yes, but make sure the patch is smooth and blends well with the wall before spraying.
How long should I wait before painting the patched area?
Wait at least 24 hours. Make sure it’s fully dry and sanded.
What tools do I need for drywall patching?
You’ll need a utility knife, joint knife, drywall saw, sanding block, and primer/paint tools.
Is it necessary to sand between patch layers?
Yes! It helps each layer stick better and keeps the surface smooth.
Can I patch drywall in humid conditions?
You can, but drying takes longer. Use fans or dehumidifiers to help things along.
Conclusion
To avoid flashing and shiners after patching drywall, focus on doing each step the right way: clean the surface, choose the right compound, apply thin layers, feather the edges, and always prime before painting. Pick your paint carefully and check your work with good lighting.
By following these tips—and avoiding a few common mistakes—you’ll get a smooth, flawless finish that blends right in with the rest of your wall.